How Can We Help?
Creating a Schedule
This page is an example of how to create a new schedule in Foresite Manager from the Web Application.
Instructions
To create a new schedule in Command Scheduling, complete the following steps:
-
-
- Log on to the Command Scheduling web application at https://app.foresitemanager.com/
- Once logged on, click on the Home icon in the top navigation.

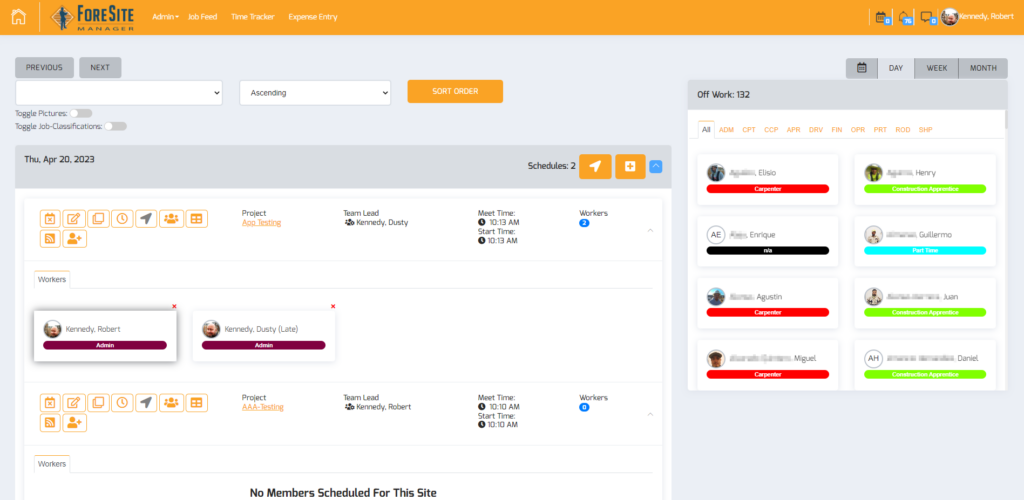
- Once the system loads the Dashboard page, you should see several items at the top.

- Previous – This button let’s the user navigate to the previous set of schedules based on the view selected; the previous day, previous week, or previous month.
- Next – Just like the Previous button except it navigates to the next set of schedules.
- Jobsite – This dropdown allows the user to sort the schedules according to the selected option. Options are: Jobsite, Distance from Current Location, Team Lead, and Schedule Size.
- Ascending – This dropdown allows the user to sort the selected option by either ascending or descending. Clicking the Change Order button will execute the sort based on the 2 dropdowns.
- Toggle Pictures – Clicking on this toggle will add/remove employee profile pictures from their employee cards. This is useful if the user is looking to regain space on the schedule.
- Toggle Job-Classifications – Clicking on this toggle will add/remove employee job-classifications from their employee cards. This is useful if the user is looking to regain space on the schedule.
- Calendar – The calendar icon opens a calendar allowing the user to select a particular date to jump to.
- Day – Selects the Day view for schedules.
- Week – Selects the Week view for the schedules.
- Month – Selects the Month view for the schedules.
- Off Work – Displays the number of employees currently not assigned to a schedule.
- Equipment – Displays the number of equipment currently not assigned to a schedule.
- Once you’ve found the day that you want to create a schedule for, click on the “+” button on the far right of the date header row.

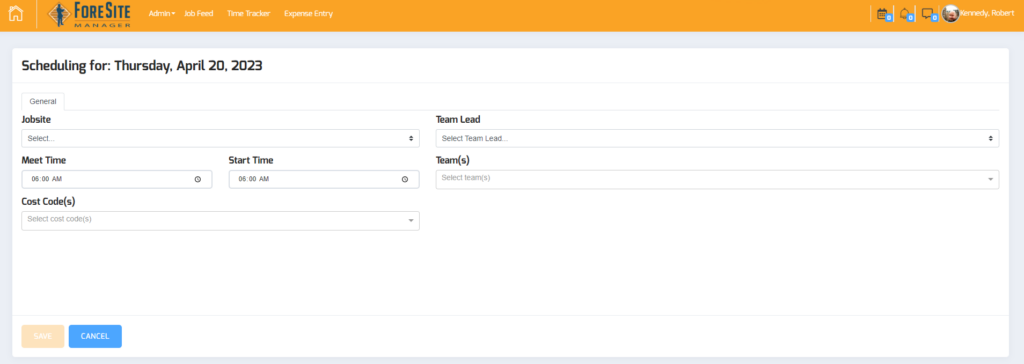
- This will open the New Schedule page for you to create a new schedule.

- Let’s take a look at the different areas on this page and what each field means.
- Jobsite – This is a required field. The Jobsite field relates to where the scheduled work will occur. This is the most important part of creating a schedule. This will inform all of the scheduled associates where to meet for work.
- Meet Time – This is the time upon which the scheduled associates are to meet for their assigned shift.
- Start Time – This is the time upon which the scheduled work should start.
NOTE: Meet Time and Start Time can be different. For example, scheduled associates may meet at the shop at a certain time so that they can travel to the Jobsite so that the can start at a certain time. This is beneficial when teams or associates are in different locations and it may make more sense for some team members to meet directly at the Jobsite. - Team Lead – This is a required field. Team Leads are like the foremen of the group. They will oversee the jobsite and perform Team Lead functions in the Command Scheduling application.
- Team(s) – This is a predefined Team or Truck that can be added to a Jobsite. Teams and Trucks allow for a static group of people to be added to a team or truck that will always be with that team or truck.
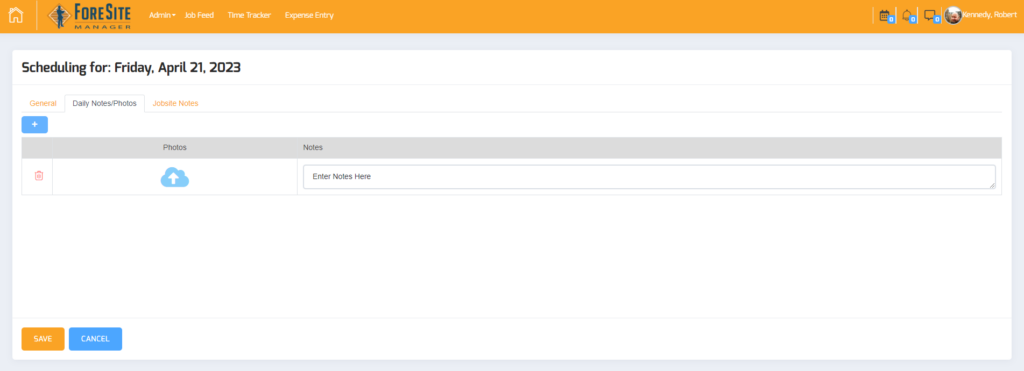
- After the schedule has been created and saved, the user can click on the edit icon for the corresponding schedule and edit the content, add notes/photos, and view job notes.

- Once you’ve completed all of the fields according to your schedule’s requirements, click on the Save button. You’ll be taken back to the Dashboard where you will see your new schedule

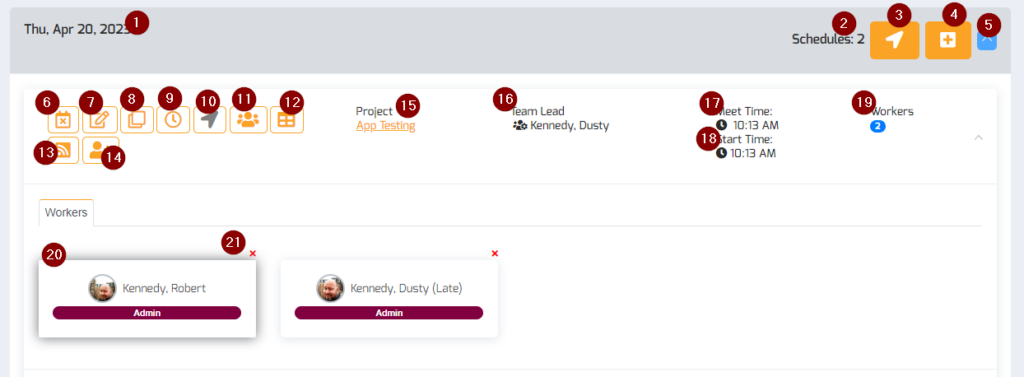
- Let’s go over a few icons on the schedule.
- Schedule Date – Displays the day for schedules in question.
- Schedules – Total number of schedules for the day in question.
- Publish All – Clicking on this button publishes all schedules and sends notifications to all users on all schedules.
- Add Schedule – Clicking this button opens the add schedule form for the day in question.
- Collapse All – Clicking on this button collapses/expands all schedules for the day in question.
- Delete – This icon represents the Delete function. This will delete the schedule in question. There can be no employees assigned to a schedule for it to be deleted.
- Edit – This icon represents the Edit function. This will open the previous New Schedule page in edit mode to allow you to edit the aforementioned fields.
- Clone – This icon represents the Clone function. This allows the user to copy the schedule in question (and all schedule attributes) to the next day.
- Team Lead Time Tracker – This icon represents the Team Lead Time Tracker function. This allows the user (with Team Lead, Scheduler or Admin role) to view all employees assigned to that schedule and manually clock in each employee.
- Publish Schedule – Clicking on this button publishes this schedule and sends notifications to all users on this schedule.
- Bulk Add – Clicking this button opens the bulk add window allowing the user to select multiple employees at once to add to a schedule.
- End of Day Wizard – Clicking this button opens the End of Day Report Wizard for the user to complete.
- Job Feed – Clicking this button takes the user to the Job Feed for the selected Jobsite.
- Jobsite Invite – Clicking this button allows the user to invite an individual to follow this Jobsite.
- Project – The Project Name on the schedule is actually a link. Clicking on this will open a Google Map with the jobsite location identified.
- Team Lead – The Team Lead is simply the individual that has been identified as the team lead for that schedule.
- Meet Time – This is the time the employees are scheduled to meet to begin their shift. This could be different from Start Time if the employees are going to meet at one location and travel to another prior to the Start Time.
- Start Time – This is the time that work is scheduled to begin on the Jobsite.
- Total Worker Count – This is just the number of individuals scheduled on the jobsite.
- Employee Card – This represents the individual employee on the schedule. If the employee card is outlined in green, the employee in question is currently clocked in. If the employee card is outlined in blue, the employee in question is currently selected to be transferred to another schedule or added to a schedule via the bulk add.
- Delete Employee – The red X on the employee card allows the user to delete or remove the employee from the schedule.
- Now that we know about the information and functions listed in this section, let’s go ahead and assign employees to the schedule.
- From the Day View, you’ll notice a list of Off Work employees to the right of the screen. These are all employees that have not been assigned to a schedule.

NOTE: You’ll see different tabs at the top of the Off Work list. These tabs display all employees with that specific job classification. For example, “CPT” in the above screenshot stands for Carpenter. Everyone on the CPT tab are individuals that have the Carpenter job classification. This allows for quick selection of employees if a particular job classification is needed on a schedule. - From here, to add an employee to a schedule, all you have to do is drag-and-drop an employee from Off Work to the desired schedule. If using a mobile device, you’ll use tap-and-tap, meaning you’ll tap on the employee in question and then tap on the schedule that you want to assign the employee to.
- Once you’ve scheduled all employees, you have the option of doing the same for equipment. Available Equipment is located below the Off Work box of employees.
- After all Employees and Equipment have been added to a schedule, your schedule should look like the above screenshot.
- If you schedule someone to a jobsite by mistake, simply click on the delete icon beside the person in question to remove them.
- Once the schedule is configured to your liking, simply click on the Publish Schedule icon to lock in the schedule and notify all employees for that schedule.
- And that’s it!
-
